TABLE OF CONTENTS
|
CHROMEOS/CHROMEBOOKS
INTRO
Here are some excellent resources regarding ChromeOS
devices and the use of ChromeOS:
|
LINUX ON A
CHROME DEVICE
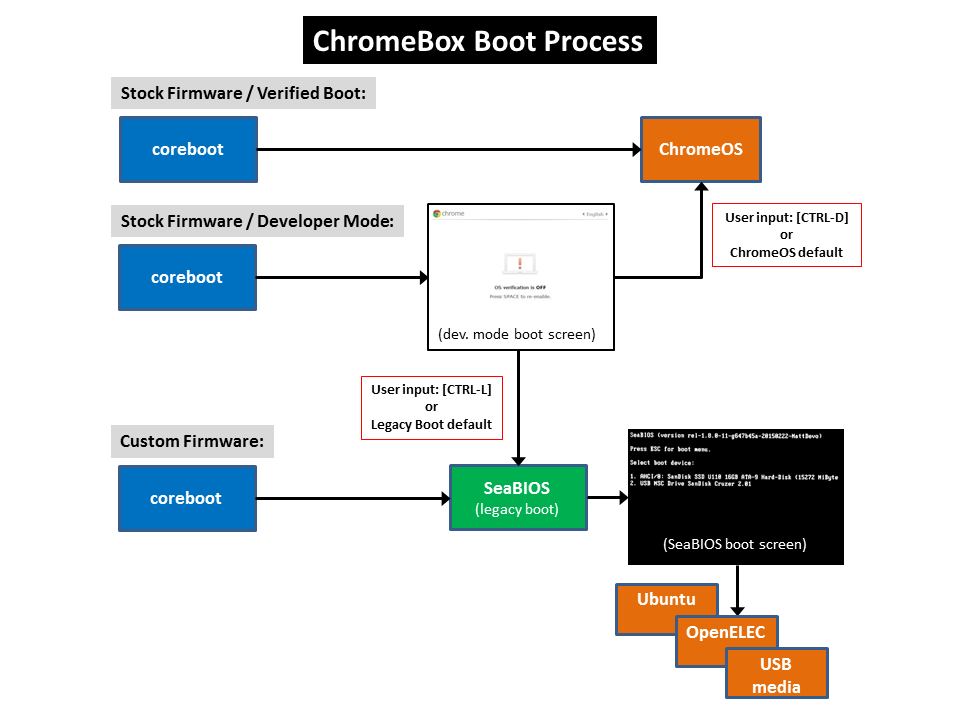
There are three ways that Linux can be run on a
Chromebook/Chromebox (all of which depend on the ability
to enter 'Developer Mode'):
- In parallel
with a running ChromeOS session using crouton.
All (?) Chrome devices should be able to use this
method.
- In a dual-boot
configuration with ChromeOS, where either ChromeOS is
booted or the installed Linux distro is booted
according to one's choice. The Linux install can
either live inside the hard-drive/SSD containing
ChromeOS, or on a separate USB storage device.
This method requires legacy SeaBIOS
functionality, which some Chrome devices either
naturally provide, or can be added with 3rd-party
firmware, or not at all.
- In a solo stand-alone OS replacement of the entire
ChromeOS device, where the ChromeOS has been
completely removed. SeaBIOS
is required for this as well, and is very similar to
the 2nd option. This will not be discussed on
this page.
|
ENABLING
DEVELOPER MODE ON ACER C720 CHROMEBOOK
By design, all ChromeOS devices are secured and locked to
only run verified ChromeOS -- with no choice to run a
regular Linux distro at all.
In order to enable a Chromebook/Chromebox to ultimately
dual-boot Linux in a separate partition, or run it in
parallel with ChromeOS via 'crouton', it is necessary to
enable 'Developer Mode' -- which enables the 'superuser'
shell inside ChromeOS. Note that by doing so the
device will be completely reset -- erasing the hard drive
and all user settings/customization/files completely. To
enable 'Developer Mode', enter the following key sequence
while powered off:
Escape-Refresh-PowerOn (while powered
off)
Ctrl-d (after the recovery message comes up)
This will initiate the process of placing the
Chromebook into Developer Mode, which will take
about 20 minutes to complete. From that point on,
the device will always be vulnerable to reset back to a
normal state (and erasing all if the space bar is
pressed while booting -- so beware! More
information on changing to 'developer mode':
After activating 'Developer Mode' on a Chromebook, you now
have the ability to enter the 'superuser' shell in order
to make even further changes to the way it operates
(including installing/running Linux). There are two
ways to do this:
- At the ChromeOS welcome screen, before configuration
or logging into your account, press the following key
sequences:
Ctrl-Alt-ForwardArrow
[sign on as 'chronos' (no password required)]
or
- After the ChromeOS welcome screen, after
configuration or logging into your account:
Ctrl-Alt-t [type 'shell'
to automatically sign on as 'chronos']
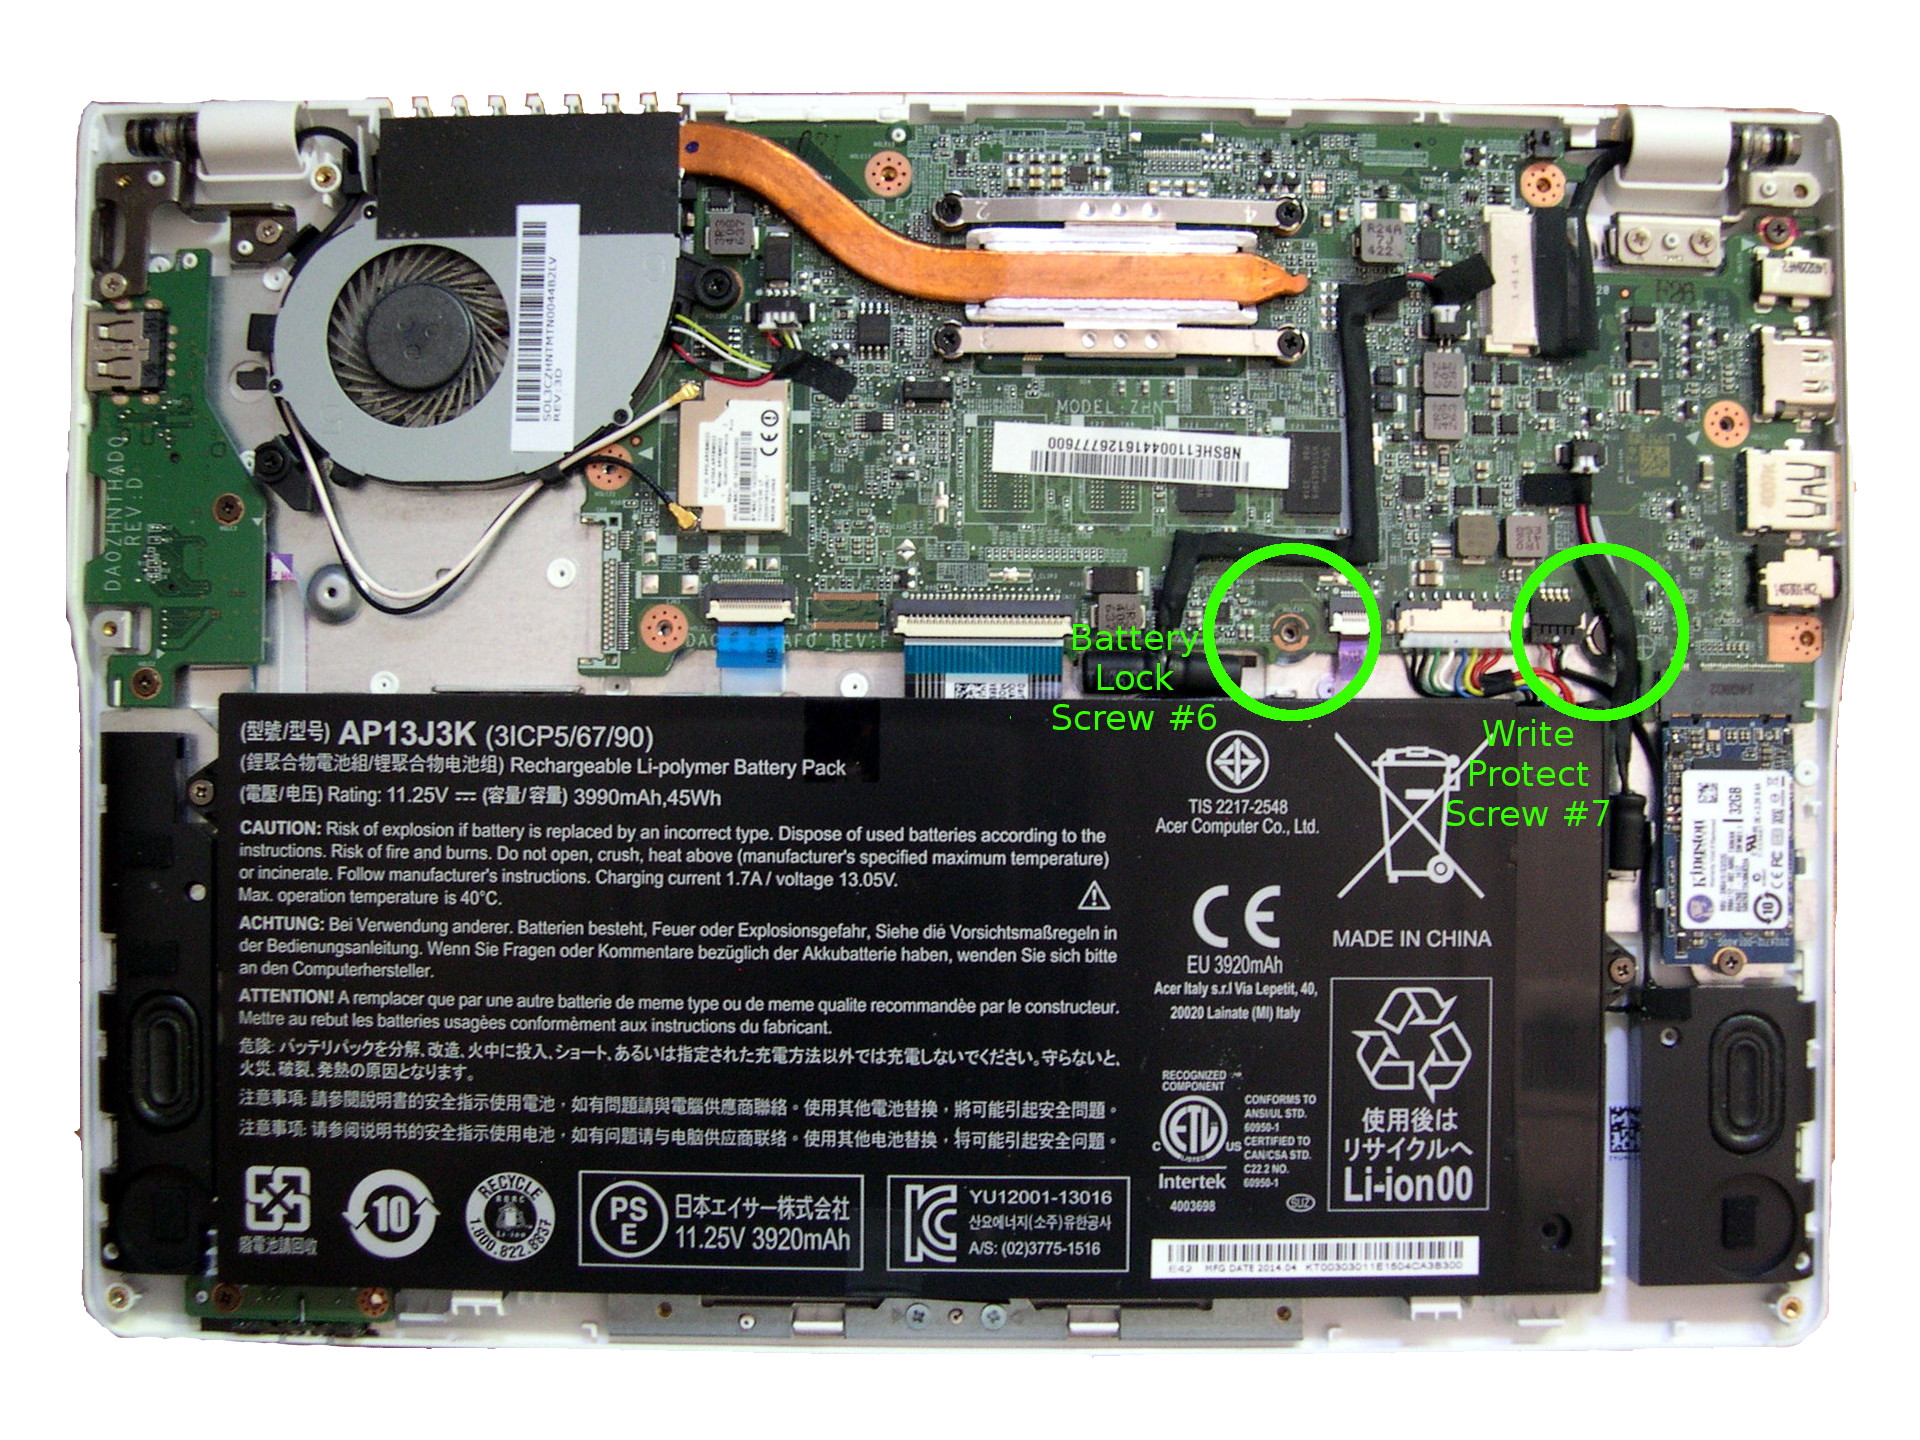
One way to reduce or eliminate the risk of leaving
'developer mode' unintentionally is to make some firmware
setting changes. These need to be made while the
C720 'write protect screw' (#7) is removed. Refer to
this photo for the location of this special screw:
While in the process of tweaking/testing the Chromebook,
as a minimum the 'battery lock screw' (#6) needs to be
used to attach the bottom cover. More
diagrams/instructions can be found here:
Enter either one of the following while in the 'superuser'
shell:
- To reduce the boot delay from 30s to 1s:
sudo /usr/share/vboot/bin/set_gbb_flags.sh 0x1
- To permanently set 'Developer Mode':
sudo /usr/share/vboot/bin/set_gbb_flags.sh 0x8
sudo /usr/share/vboot/bin/set_gbb_flags.sh 0x9
When the adjustments to the firmware are completed and
tested successfully, the 'write protect screw' should be
replaced, and all the original screws used to attach the
bottom cover can again be used to close the
Chromebook. Removal of the 'write protect screw'
should never be required again -- unless further similar
firmware changes are required.
NOTE: Another option that you might want to consider while
the 'write protect screw' is removed is the replacement of
the 'Developer Mode' warning screen with a simple lowkey
white-text-on-black-screen. For more information,
see here.
|
ENABLING
USB & LEGACY BOOT MODE ON ACER C720 CHROMEBOOK
In preparation for setting up an Acer C720 for
dual-booting a Linux distro of your choice (in my own,
Linux Mint Debian Edition), 'SeaBIOS'
needs to be activated within the 'superuser' shell.
This ability is not present on all Chromebooks/Chromeboxes
-- fortunately, the Acer C720 firmware includes
this. Other Chrome devices can be modified to do so,
while yet others cannot (or not yet) do so. See the
following for more information on models that do have/can
have/do not have 'SeaBIOS' capability:
The following settings need to made in a terminal session,
while signed on as 'chronos' (see above for instructions):
sudo crossystem
                    dev_boot_usb=1
sudo crossystem
                    dev_boot_legacy=1
After making these changes, you should now be able to
press Ctrl-l when powering up -- after the
'Developer Mode' warning screen appears -- to boot using
SeaBIOS i.e. if a bootable 'live' Linux USB stick/drive is
present at this point, it will show up as an option on a
legacy-mode bootup list. NOTE: other similar
'crossystem' commands can be used to set SeaBIOS as the
default boot method -- see How
to make the legacy SeaBIOS firmware slot the default on
a Haswell/Broadwell based Chromebook – johnlewis.ie
for more information.
NOTE: Subsequent removal of the 'write protect screw' on
the Acer C720 appears to set these USB/legacy-boot flags
back to their '0' defaults, so you may need to repeat
these commands if you do so.
For information on enabling SeaBIOS can be found here:
|
DEBIAN/CINNAMON
LINUX ON ACER C720 CHROMEBOOK VIA CROUTON
My favorite Linux distro is Linux
Mint Debian Edition, otherwise known as LMDE.
I had managed to install this distro on my Acer C720P Chromebook in a
separate partition of the SSD drive, in true 'dual boot'
fashion, and I loved it! However, I had not
seriously considered the hybrid crouton
method, since LMDE/Cinnamon was not supported. In
fact (as of this writing) the 'cinnamon' desktop option
had once been present as a crouton install option, but had
been removed (!), leaving only 'Debian' as a partial
solution.
I decided to give Debian/Cinnamon another try, after
reading Tenn1518's
github crouton-cinnamon
page. Below is my own version based on this
information.
Useful Links:
NOTE: Your Chromebook (in my case an Acer C720P) must be
been switched to developer mode before crouton can
be installed (see above).
NOTE: You might experience loss of keyboard and/or mouse
during the install. Be prepared by having a
spare USB keyboard/mouse handy if this happens to
you!
Installing
Crouton
To install a Debian/Cinnamon-flavored crouton:
1) Create a 'crosh' terminal window tab:
Ctrl-Alt-t
2) Enter 'shell' mode:
shell
3) Navigate into 'Downloads' directory, where the script
lives:
cd ~/Downloads
4a) Download crouton from web browser into 'Downloads'
directory:
https://github.com/dnschneid/crouton
4b) Or download crouton from command line in shell using
'wget':
wget https://github.com/dnschneid/crouton/raw/master/installer/crouton
5a) Install crouton:
sudo sh ~/Downloads/crouton -r jessie -t keyboard,cli-extra,extension,xiwi,xorg
By default, the location to which this 'jessie' chroots
for crouton will be installed is:
/mnt/stateful_partition/crouton/chroots/jessie
If you would prefer to run crouton on an external device
instead, the following extra steps and variations are
required/recommended:
5b) Format a partition on an external device (SD card, USB
stick, USB drive, etc.) as 'ext4' with the label
'CROUTON'. Then install crouton to this external
device:
sudo sh ~/Downloads/crouton -r jessie -t keyboard,cli-extra,extension,xiwi,xorg -p /media/removable/CROUTON/
6) Enter newly-created chroot:
sudo enter-chroot
	or
sudo enter-chroot -c /media/removable/CROUTON/chroots/	(if installed externally as above)
[Here is my log from
this step]
Later, to see what environments have been installed:
sudo edit-chroot -a
	or
sudo edit-chroot -a -c /media/removable/CROUTON/chroots/ (if installed externally as above)
Installing
Cinnamon
7) Get cinnamon stuff:
sudo apt-get install software-properties-common
sudo apt-get update
sudo apt-get install cinnamon
cd ~/Downloads
sudo apt-get install git
git clone https://github.com/Tenn1518/crouton-cinnamon
cd crouton-cinnamon
cp Linux/xinitrc ~/.xinitrc
8) Exit the chroot back into the shell and
complete Cinnamon setup:
exit
cd ~/Downloads/crouton-cinnamon
sudo cp "Chrome OS/startcinnamon" /usr/local/bin/startcinnamon
9) Also install crouton integration extension for Chrome
browser:
Crouton
Integration - Chrome Web Store [direct link, since
unlisted]
[Here is my log from
this step]
Installing Extra
Stuff
At this point, you have a good basic installation for
running Debian/Cinnamon, but it is useful to add some
good apps at this point to bring this closer to a
regular Linux Mint Debian Edition installation:
- Go back into the chroot and install some stuff from
the Mint repositories:
sudo enter-chroot
sudo vi /etc/apt/sources.list
add into this the following repository entry:
deb http://packages.linuxmint.com betsy main
deb http://packages.linuxmint.com debian import
Update the repository list and fix the GPG key for the
Mint repository:
sudo apt update
sudo gpg --keyserver pgp.mit.edu --recv-keys 3EE67F3D0FF405B2
sudo gpg --export 3EE67F3D0FF405B2 > 3EE67F3D0FF405B2.gpg
sudo apt-key add ./3EE67F3D0FF405B2.gpg
sudo rm ./3EE67F3D0FF405B2.gpg
Get some nicer wallpaper and Firefox (and anything
else you want):
sudo apt install mint-backgrounds-petra
sudo apt install firefox
Then, comment out (or remove)
that linuxmint entry (for safety?)
- Next, get other useful apps from the standard
Debian repositories, and anything else that you want:
sudo apt update
sudo apt install vlc
sudo apt install gimp
sudo apt install geeqie
sudo apt install libreoffice
sudo apt install xvkbd
sudo apt install gnome-screenshot
sudo apt install gnome-terminal
sudo apt install locales
Fix the 'locales' so that gnome-terminal works properly:
sudo dpkg-reconfigure locales
[pick 'en_US.UTF-8 UTF-8' for both choices]
- Get Chrome browser and install it:
https://www.google.com/chrome/browser/desktop/index.html
sudo dpkg -i chrome_whatever_name.deb
sudo apt install -f
Also get the Chrome remote desktop app:
Chrome
Remote Desktop - Chrome Web Store
You also need to get and install a local binary:
wget http://dl.google.com/linux/direct/chrome-remote-desktop_current_amd64.deb
sudo dpkg -i chrome-remote-desktop_current_amd64.deb
sudo apt install -f
- Get Skype and install it:
http://www.skype.com/en/download-skype/skype-for-linux/downloading/?type=debian32
sudo dpkg -i skype_whatever_name.deb
sudo apt install -f
- Also install crouton integration extension for
Chrome browser:
Crouton
Integration - Chrome Web Store [direct link,
since unlisted]
[Here is my log from
this step]
Starting/Using
Debian/Cinnamon with Crouton
[crouton
in a Chromium OS window (xiwi) · dnschneid/crouton Wiki]
You are now done, and ready to use Debian/Cinnamon in
crouton! Here is some extra info to get you going on
using it...
You should be in the 'crosh' terminal when starting
cinnamon.
- To start cinnamon normally in full-screen mode
(without 'xiwi'):
sudo startcinnamon -X xorg
	or
sudo startcinnamon -X xorg -c /media/removable/CROUTON/chroots/	(if installed externally as above)
To switch back-and-forth from ChromeOS to crouton in
this mode:
Ctrl-Alt-Shift-ForwardArrow
or
Ctrl-Alt-Shift-BackwardArrow
- To start cinnamon with 'xiwi' in a browser
tab/window (taking note that it only uses slower
software-based rendering):
sudo startcinnamon
To switch back-and-forth from ChromeOS to crouton in
this mode:
Ctrl-Alt-Shift-ForwardArrow
or
Ctrl-Alt-Shift-BackwardArrow
You can also use the SwitchScreen key to display
a list of active windows that can be switched to using
mouse or LeftArrow/RightArrow keys.
If you just want to run a single app under
xiwi:
sudo enter-chroot
xiwi appname
or
xiwi -T appname
(to run in a terminal)
or
xiwi -F appname
(to run full-screen)
You can also do this all on one line from the crosh
shell e.g.
sudo enter-chroot xiwi -T appname
Use the FullScreen button to toggle full-screen
crouton.
- To activate 2-finger scrolling in crouton, navigate
to the Cinnamon 'Preferences/Mouse and
Touchpad/Touchpad' menu, and set the 'Panel
Layout' to 'Two-finger scrolling'.
Optionally, check the 'Enable horizontal scrolling'
checkbox.
- To change the volume in crouton:
Search-VolumeUp
or
Search-VolumeDown
A better way to control volume is to assign the
actual ChromeOS 'VolumeUp and VolumeDown'
and ' VolumeToggle' keys to those
functions. Do this by navigating to the Cinnamon
'Preferences/Keyboard/Keyboard shortcuts' menu
and assigning 'Custom Shortcuts' via the following
keyboard bindings:
F8 = command "amixer set Master toggle"
F9 = command "amixer set Master 10%-"
F10 = command "amixer set Master 10%+"
- To change screen brightness (note: doesn't seem to
have full-range of brightness):
Search-BrightnessUp
or
Search-BrightnessDown
A better way to control brightness is to assign the
actual ChromeOS BrightnessUp and BrightnessDown
keys to those functions. Do this by navigating
to the Cinnamon Preferences/Keyboard/Keyboard
shortcuts menu and assigning 'Custom Shortcuts'
via the following keyboard bindings:
F6 = command 'brightness down'
F7 = command 'brightness up'
- To set the Delete/Home/PageDown/PageUp/F1/F2/Refresh
keys, you can use a subset of the '$HOME/.xbindkeysrc'
file mentioned above for use with the 'xbindkeys'
utility (make sure that 'xvkbd' is installed as well):
"xvkbd -xsendevent -text '\[Delete]'"
Alt + BackSpace
"xvkbd -xsendevent -text '\[End]'"
Alt + Right
"xvkbd -xsendevent -text '\[Home]'"
Alt + Left
"xvkbd -xsendevent -text '\[Page_Down]'"
Alt + Down
"xvkbd -xsendevent -text '\[Page_Up]'"
Alt + Up
"xvkbd -xsendevent -text "\A\[Left]""
m:0x0 + c:67
F1
#Forward
"xvkbd -xsendevent -text "\A\[Right]""
m:0x0 + c:68
F2
#Refresh
"xvkbd -xsendevent -text "\Cr""
m:0x0 + c:69
F3
Then run in a terminal:
xbindkeys
Miscellaneous
Tasks
- To change the crouton root password:
sudo enter-chroot
sudo passwd root
- To configure an SSH server:
[Chromebook:
run a SSH server on Chrome OS]
[Running
servers in crouton]
sudo apt install ssh
Add the following to '/etc/rc.local' so that the SSH
server starts automatically each restart:
/sbin/iptables -P INPUT ACCEPT
mkdir -p -m0755 /var/run/sshd
/usr/sbin/sshd
- To configure a CUPS print server:
[Printing
from Crouton]
sudo apt-get install cups
sudo adduser yourusername
                        lpadmin
Add the following to '/etc/rc.local' to that the
printer server starts automatically each restart:
/usr/sbin/cupsd
Lgout and back into crouton to continue.
Download/install any needed printer drivers.
For example, for a Brother printer, from http://support.brother.com/g/s/id/linux/en/download_prn.html,
get the 'LPR driver' and 'cupswrapper driver', and
install them. For example, as of this writing,
the two driver packages for the HL2030 printer:
sudo dpkg -i brhl2030lpr-2.0.1-1.i386.deb
sudo dpkg -i cupswrapperHL2030-2.0.1-2.i386.deb
Navigate with web browser to http://localhost:631/printers,
and 'Administration/Modify Printer' to your
requirements. For me, setting the printer up as
a network printer, protocol I used successfully is:
lpd://192.168.1.1/LPRServer
Then use 'Maintenance/Print Test Page' to test the
printer if you wish. You might also want to
change the default paper size to 'Letter'.
- To automatically turn off bluetooth (if you don't
plan on using any such devices and want to preserve
some battery life), add the following to
'/etc/rc.local':
rfkill block bluetooth
- To update/repair Debian/Jessie Crouton after an
automatic ChromeOS upgrade:
sudo sh ~/Downloads/crouton -u -n jessie
- To see which version of Crouton and chroot you are
running, from within chroot:
croutonversion -u -d -c
alias xorg="sudo startcinnamon -X xorg"
alias xiwi="sudo startcinnamon"
alias chroot="sudo enter-chroot"
If you installed crouton
to an external device, use something like these
instead:
alias xorg="sudo startcinnamon -X xorg -c /media/removable/CROUTON/chroots/"
alias xiwi="sudo startcinnamon -c /media/removable/CROUTON/chroots/"
alias chroot="sudo enter-chroot -c /media/removable/CROUTON/chroots/"
Activate these changes:
. ~/.bashrc
|
LINUX
MINT DEBIAN EDITION ON ACER C720 CHROMEBOOK VIA
DUAL-BOOT
Once legacy-supporting SeaBIOS mode is enabled, the
option of running Linux -- in this case, the desired
Linux distro is 'Linux
Mint Debian Edition' (LMDE, specifically
'lmde-2-201503' with kernel version '3.16.0-4') -- as a
dual-boot option on the Chromebook.
The easiest/safest method is to install the desired
Linux distro to a USB stick/dongle. An excellant
choice for this is a SanDisk
Ultra Fit 128GB USB 3.0 flash drive, due to its
small size and good speed. I currently consider
this to be the optimum solution, since it allows the
same portable drive to be shared among multiple
Chromebooks (or other computers), and avoids the risk of
accidental erasure if 'Developer Mode' is inadvertently
turned off. Another advantage to this method is
that the Linux install is not jeopardized if/when
ChromeOS needs to be re-installed for unforeseen
reasons.
The cheapest/fastest method, is to re-partition the
Chromebook SSD to run Linux internally. What makes
this a bit complicated is that Chromebooks use the more
modern 'GPT' ('GUID Partition Table') partition layout instead of the older
'MBR' ('Master Boot Record'). Scripts/commands that manipulate the GPT
partition tables are needed. As of this date,
there appears to be at least two 3rd party scripts that
make this partitioning relatively safe and easy.
Do this at your own risk!
- The first partitioning step using ChrUbuntu
method by Jay Lee (uses this
script)
- The first partitioning step using chrx
method by reynhout (uses this script)
Run the first step of either one of these scripts to just
re-partition the SSD to make room for the new Linux
distro. Make sure that you leave sufficient room
for ChromeOS itself i.e. at least 1gb or 2gb more than
the size of ChromeOS itself. Here is a sample
session creating an 80gb partition using the chrx
script method on an Acer C720P Chromebook:
chronos@localhost / $ cd ; curl -Os https://chrx.org/go && sh go -v
chrx installer, version 2.4.1

    Hardware ID: PEPPY_E6I-W3G-A4E
    Model:       Acer C720, C720P Chromebook
    Released:    2013
    CPU Family:  Intel Haswell
    Prognosis:   success likely, model is well-tested

Checking hardware support for legacy boot...  OK
Setting up target disk /dev/sda...

How much disk space should we reserve for Linux?

Choose between 5 and 115 GB (recommended: 114).

Enter size in GB [114]: 80
  stateful_start 8671232
  stateful_size  73560064
  kernc_start    82231296
  kernc_size     32768
  rootc_start    82264064
  rootc_size     167772160

Modifying partition table to make room for Linux.

Your Chromebook will reboot and clear your data.

Run chrx again to install Linux.

Press [enter] to continue:
After rebooting, ChromeOS must repair itself before
further work can be done.
Then proceed to boot (with Ctrl-l) your desired
distro, and install it onto the newly-created Linux
partition i.e. probably '/dev/sda7'
(previously labelled 'ROOT-C'),
which should have been made larger by the scripts
above. NOTE: It is out of the scope of this
document to explain what Linux distro to pick, how to
put the distro installer onto a bootable USB
stick/drive, and how to boot/install it onto a storage
partition!).
After installation, there are some good tweaks to do to
make everything run smoothly (note that newer versions
of Linux Mint Debian Edition might make some/all of
these tweaks unnecessary, so verify whether you require
them before applying):
- TOUCHPAD: Adjust touchpad settings in '/etc/X11/xorg.conf.d/50-c720-touchpad.conf':
Section "InputClass"
    Identifier      "touchpad peppy cyapa"
    MatchIsTouchpad "on"
    MatchDevicePath "/dev/input/event*"
    MatchProduct    "cyapa"
    Option          "TapButton1" "1"
    Option          "TapButton2" "3"
    Option          "TapButton3" "2"
    Option          "FingerLow" "5"
    Option          "FingerHigh" "5"
    Option          "VertEdgeScroll" "0"
    Option          "AreaRightEdge" "850"
    Option          "AreaLeftEdge" "50"
    Option          "VertTwoFingerScroll" "on"
    Option          "HorizTwoFingerScroll" "on"
EndSection

# Also scroll options do not work with '1/0' and must use 'on/off'
Also, in order to prevent Gnome and Cinnamon
from overriding these touchpad settings, you have to
deactivate their mouse-daemon plugins with these
commands:
gsettings set org.gnome.settings-daemon.plugins.mouse active false
gsettings set org.cinnamon.settings-daemon.plugins.mouse active false
An alternative to using these shell commands is to
install 'dconf-editor' and then to
de-activate these settings using the GUI utility
instead.
You must logout/login or reboot for these changes to
take effect. Lots of good information can be found
here:
Touchpad Synaptics - ArchWiki
- WIRELESS: Improve wireless settings in '/etc/modprobe.d/ath9k.conf'
(not required for kernels 4.2+?):
options ath9k nohwcrypt=1 blink=1 btcoex_enable=1 enable_diversity=1
- MICROPHONE: Fix microphone sound settings in
'/etc/modprobe.d/snd-hda-intel.conf':
options snd-hda-intel model=,alc283-dac-wcaps
- SUSPEND: Fix suspend settings in '/etc/modprobe.d/tpm_tis.conf':
options tpm_tis force=1
Also these to fix suspend settings in '/etc/modprobe.d/blacklist.conf':
blacklist ehci_hcd
blacklist ehci_pci
Run the following command:
sudo depmod -a && sudo update-initramfs -u
NOTE: You need to reboot after making changes to
modprobe files, in order for them to take effect.
- KEYBOARD: To re-map some Chromebook keys to
more intuitive values, first install some required
utilities if they are absent:
apt install xbacklight
apt install xvkbd
apt install xbindkeys
Next, update the file '$HOME/.xbindkeysrc':
"xbacklight -dec 10"
m:0x0 + c:72
F6
"xbacklight -inc 10"
m:0x0 + c:73
F7
"amixer set Master toggle"
m:0x0 + c:74
F8
"amixer sset Master 10%- unmute"
m:0x0 + c:75
F9
"amixer sset Master 10%+ unmute"
m:0x0 + c:76
F10
"xvkbd -xsendevent -text '\[Delete]'"
Alt + BackSpace
"xvkbd -xsendevent -text '\[End]'"
Alt + Right
"xvkbd -xsendevent -text '\[Home]'"
Alt + Left
"xvkbd -xsendevent -text '\[Page_Down]'"
Alt + Down
"xvkbd -xsendevent -text '\[Page_Up]'"
Alt + Up
"xvkbd -xsendevent -text "\A\[Left]""
m:0x0 + c:67
F1
#Forward
"xvkbd -xsendevent -text "\A\[Right]""
m:0x0 + c:68
F2
#Refresh
"xvkbd -xsendevent -text "\Cr""
m:0x0 + c:69
F3
Then run in a terminal:
xbindkeys
An alternative method for setting some of these keys
would be to use the technique described below in the 'Preferences/Keyboard/Keyboard
shortcuts' instructions.
- TOUCHPAD/SCREEN KERNEL: For the Acer C720P,
you need a Linux kernel 3.17+ (actually, 3.16.0.4
seems to work as well) in order for the touchscreen to
work. At the time, the easiest way was to
download from:
https://blog.mdosch.de/tag/acer-c720/
(GOOGLE TRANSLATION)
Another newer option that appears to work is to use
Debian 8 Jessie 'backports'
to install the latest generic stable kernels (from
instructions found Linux
Kernel 4.1 on Debian 8):
Add the following entries to '/etc/apt/sources.list.d/jessie-backport.list':
deb http://ftp.us.debian.org/debian/ jessie-backports main
deb-src http://ftp.us.debian.org/debian/ jessie-backports main
Refresh the apt repositories with:
apt update
The newest kernel should now be available:
apt install -t jessie-backports linux-image-amd64
As of this writing, the version was '4.5.0-0.bpo.1-amd64'.
Note that with the 'backports' repository present like
this, it is also possible to install the backports of
other popular packages e.g.
apt install -t jessie-backports libreoffice
apt install -t jessie-backports libreoffice-avmedia-backend-gstreamer
For a list of other backported packages, see Debian
Backport Packages.
NOTE: Another 'extreme' option is to get the latest mainline kernel from here:
http://kernel.ubuntu.com/~kernel-ppa/mainline/
Specially, you can find the latest non-RC kernel directory in this listing (as of this writing, it was v4.15/). Inside, you would download and then 'dpkg -i' the following pieces:linux-headers-4.xx.x-xxxxxx_4.xx.x-xxxxxx.yyyymmddhhmm_all.deb
linux-headers-4.xx.x-xxxxxx-generic_4.xx.x-xxxxxx.yyyymmddhhmm_amd64.deb
linux-image-4.xx.x-xxxxxx-generic_4.xx.x-xxxxxx.yyyymmddhhmm_amd64.deb e.g.
sudo dpkg -i linux-headers-4.15.0-041500_4.15.0-041500.201802011154_all.deb
sudo dpkg -i linux-headers-4.15.0-041500-generic_4.15.0-041500.201802011154_amd64.deb
sudo dpkg -i linux-image-4.15.0-041500-generic_4.15.0-041500.201802011154_amd64.deb
deb http://repo.linrunner.de/debian jessie main
Install the required repo keys for security:
sudo apt-key adv --keyserver pool.sks-keyservers.net --recv-keys CD4E8809
Refresh the apt repositories with:
apt update
Install the TLP apps:
apt install tlp tlp-rdw
Configure
and start:
sudo tlp start
Interrogate as you wish e.g.
sudo tlp-stat
- SSD HEALTH: Optional, but recommended for SSD
health, is to make scripts/schedules
to automatically run the 'fstrim'
command. First, add the following to '/etc/rc.local' (somewhere
before the 'exit 0' line):
fstrim /
Next, add the following to a new script '/etc/cron.daily/trim' if
your Chromebook is always on:
#!/bin/sh
LOG=/var/log/trim.log
echo “*** $(date -R) ***” >> $LOG
fstrim -v / >> $LOG
fstrim -v /home >> $LOG
[if '/home'
is on a separate partition]
Fix the execute bits for this new script:
sudo chmod +x /etc/cron.daily/trim
Also optionally instead 'smartmontools' so that you can
interrogate the SSD drive health:
apt install smartmontools
sudo smartctl --all /dev/sda -d sat
|
CHROMEBOOK
DISK MAP
Using the following command:
sudo cgpt show /dev/sda
...here is a map of the ChromeOS SSD on an Acer C720 (16gb
SSD):
start size part contents
0 1 PMBR (Boot GUID: 205DDDF5-1DEF-E049-AC7B-6FE0FB105C6D)
1 1 Pri GPT header
2 32 Pri GPT table
8671232 22573056 1 Label: "STATE"
Type: Linux data
UUID: 36F7A5F6-9960-1743-ACDA-CA73E7A5F26C
20480 32768 2 Label: "KERN-A"
Type: ChromeOS kernel
UUID: EC355231-0531-8E43-B41D-3D2EAFFC0B94
Attr: priority=1 tries=0 successful=1
4476928 4194304 3 Label: "ROOT-A"
Type: ChromeOS rootfs
UUID: 5393825B-2588-7B48-A393-A03A09598D76
53248 32768 4 Label: "KERN-B"
Type: ChromeOS kernel
UUID: 72B6BF28-2F5E-1D4E-9D6F-DDBAB411BF71
Attr: priority=2 tries=0 successful=1
282624 4194304 5 Label: "ROOT-B"
Type: ChromeOS rootfs
UUID: 1283AFCA-3146-A842-A77F-0F590A5E58B8
16448 1 6 Label: "KERN-C"
Type: ChromeOS kernel
UUID: 66496701-36D1-0C4F-8162-36FE991257CB
Attr: priority=0 tries=15 successful=0
16449 1 7 Label: "ROOT-C"
Type: ChromeOS rootfs
UUID: 03BC7D11-2FD3-ED46-94AF-C7FC8BC9E87C
86016 32768 8 Label: "OEM"
Type: Linux data
UUID: F9B23F78-3333-AD4E-B933-2CE904B4BC2F
16450 1 9 Label: "reserved"
Type: ChromeOS reserved
UUID: 40706723-65A5-334D-A4E9-92D703AC9006
16451 1 10 Label: "reserved"
Type: ChromeOS reserved
UUID: C6EC9077-8BE5-AA48-BC22-BF45A3A86C5F
64 16384 11 Label: "RWFW"
Type: ChromeOS firmware
UUID: 0C8A7EC5-7407-1846-849F-F5BBCED92450
249856 32768 12 Label: "EFI-SYSTEM"
Type: EFI System Partition
UUID: 205DDDF5-1DEF-E049-AC7B-6FE0FB105C6D
31277199 32 Sec GPT table
31277231 1 Sec GPT header
Here is a simple map showing how 'cgpt' partition names equate to familiar Linux device names:
cgpt
label
name
| cgpt partition number
| linux
device
name
| partition
size
| STATE
| 1
| /dev/sda1
| +11gb
| KERN-A
| 2
| /dev/sda2
| 16mb
| ROOT-A
| 3
| /dev/sda3
| 2gb
| KERN-B
| 4
| /dev/sda4
| 16mb
| ROOT-B
| 5
| /dev/sda5
| 2gb
| KERN-C
| 6
| /dev/sda6
| 512b
| ROOT-C
| 7
| /dev/sda7
| 512b
| OEM
| 8
| /dev/sda8
| 16mb
| RESERVED
| 9
| /dev/sda9
| 512b
| | RESERVED | 10
| /dev/sda10
| 512b
| | RESERVED | 11
| /dev/sda12
| 8mb
| EFI-SYSTEM
| 12
| /dev/sda13
| 16mb
|
Here is more explanation of what those partitions are used for.
Roughly, ChromeOS takes up 7gb. Most of it is stored
in the 'KERN-A' (/dev/sda2) and 'ROOT-A' (/dev/sda3)
partitions, and in the 'KERN-B'
(/dev/sda4) and 'ROOT-B' (/dev/sda5)
partitions. The 'active' version of ChromeOS (either
the 'A' or 'B' pair of partitions) is read-only, allowing
updates to be made to the 'inactive' version before the
next reboot occurs. Each copy of ChromeOS exists in a 2GB 'ROOT-x' partition. A good chunk of space is also consumed in the 'STATE' partition, which varies in size depending on the SSD drive capacity (approximately 6GB less than this).
Typically, space to install Linux for dual-boot is taken
from the 'STATE' partition
(in RED above), and
re-assigned to the 'ROOT-C'
partition (in GREEN
above). In this example, with a 16gb SSD, the 'STATE' partition is 22573056
sectors @ 512 bytes = 11gb. All of this space can be
devoted to a Linux install, but this would leave no
storage space for ChromeOS at all -- so in this case the
recommended maximum size for Linux on a 16gb SSD would be
around 7gb or 8gb. Note that the locations of 'KERN-C' and 'ROOT-C'
are moved from their original offsets to a location within
the original 'STATE'
partition.
On a Chromebook with a 32gb drive, the 'STATE'
partition is 53825536 sectors @512 bytes = 26gb, so there
is potentially a lot more room for installing Linux i.e.
up to 23gb or 24gb.
On my C720P with the 32gb SSD replaced by a 128gb one, the
'STATE' partition is
currently 73560064 sectors @512 bytes = 35gb, while the 'ROOT-C' partition is 167772160
sectors @512 bytes = 80gb.
Examine the re-partitioning scripts mentioned above to see
how the relevant partitions are modified, but the basic
algorithm is as follows (NOTE: do NOT run these directly
unless you know what you are doing!):
# the original partition is changed to be smaller
cgpt add -i 1 -b $stateful_start -s $stateful_size -l STATE ${target_disk}
# this creates a new partition called "kernc"
cgpt add -i 6 -b $kernc_start -s $kernc_size -l KERN-C ${target_disk}
# this creates a new partition called "rootc"
cgpt add -i 7 -b $rootc_start -s $rootc_size -l ROOT-C ${target_disk}
For curiosity's sake, here is what the 'STATE' partition looks like when examined with the Linux 'tree' command:
/dev/sda1
├── dev_image
├── encrypted
├── encrypted.block
├── encrypted.key
├── home
│ ├── chronos
│ ├── root
│ │ └── 7b84d0951c0eeeeba2e89c3adf51736c2cf6495f
│ └── user
│ └── 7b84d0951c0eeeeba2e89c3adf51736c2cf6495f
├── lost+found
├── shutdown_stateful_umount_failure
└── unencrypted
├── cache
│ └── vpd
│ ├── echo
│ │ └── vpd_echo.txt
│ ├── filtered.txt
│ └── full-v2.txt
├── clobber.log
├── clobber-state.log
└── preserve
├── attestation.epb
└── attestation.epb.sum
14 directories, 10 files
|
SSH SERVER IN
CHROMEOS
There may be situations where it is desirable to
connect to your ChromeOS device via SSH, so here are
slightly-modified instructions from DcK
Area on set up an SSH server. NOTE: The actual
server comes pre-installed, but is not configured for
normal operation.
Enter a superuser shell (i.e. Ctrl-Alt-t and
typing 'shell') and enter the following to setup
the server:
sudo su
mkdir -p -m 0711 /mnt/stateful_partition/etc/ssh
cd /mnt/stateful_partition/etc/ssh
ssh-keygen -t rsa -f ssh_host_rsa_key
ssh-keygen -t dsa -f ssh_host_dsa_key # not needed anymore?
exit
To then start the SSH server:
sudo /usr/sbin/sshd
sudo iptables -I INPUT -p tcp --dport 22 -j ACCEPT
NOTE: You may get a warning message "Could not load host key" when you start the SSH server -- but if you created the key files properly ahead of this, then the reference is to a strangely-named key that could not be found -- and does not matter. The reference to this other key is in '/etc/ssh/sshd_config', but this file cannot be edited to remove this reference since it is read-only -- and even though it is possible to make the root filesystem writable, the downsides to doing so are not worth it.
NOTE: You will need to repeat these last two commands each
time you wish to start the SSH server, since there is no
(easy? safe?) way to auto-start custom commands while in
ChromeOS like this. One way to make this a bit
easier is to define some easier alias commands -- put
something like this into '~/.bashrc':
alias sshsrv='sudo /usr/sbin/sshd; sudo iptables -I INPUT -p tcp --dport 22 -j ACCEPT' NOTE: For me, I was not able to get this to work until I
configured SSH to use 'Public
Key Authentication' instead of 'Password
Authentication'. My understanding is that this is
due to the SSH server configuration setting for ChromeOS
has password authentication deactivated i.e. in
the root '/etc/ssh/sshd_config'
file is the following line:
PasswordAuthentication no
So, in order to use public key authentication
instead, while signed into the Crosh secure shell as 'chronos', enter:
ssh-keygen -t rsa
Answer the prompts, and this will populate a directory '/home/chronos/user/.ssh' with
some SSH files. Into the 'authorized_keys'
file insert an entry that corresponds to the 'id_rsa.pub' file from the
machine you intend to use to connect to ChromeOS with
(assuming that SSH is already set up there!). One way to do this with a single shell command is something like the following:
ssh user@remoteipaddress 'cat .ssh/id_rsa.pub' >> ~/.ssh/authorized_keys
You should now be able to SSH connect to the 'chronos'
session on the Chromebook from a remote PC without using a
password, and doing so securely, using default port 22:
ssh chronos@chromebookipaddr
If you do
not know the IP address of your Chromebook:
ifconfig
|
ACER C740
CHROMEBOOK: EXTRA NOTES
Given a chance to try out Linux on the faster Acer C740
Chromebook, I had my share of setbacks and successes that
I want to preserve here for others to learn from.
DEBIAN/CINNAMON
LINUX ON ACER C740 CHROMEBOOK VIA CROUTON
The instructions above for activating Developer Mode
on the C720 above, and the installing/configuring Crouton
are applicable here as well. The extra complications
that are partially addressed here are the
poorly-functioning default Intel video drivers used for
the Crouton environment. It is necessary to install
the latest Debian Jessie backport Intel video drivers.
If you haven't done so already (for other non-critical
packages as mentioned above), add the following entries to
'/etc/apt/sources.list.d/jessie-backport.list':
deb http://ftp.us.debian.org/debian/ jessie-backports main
deb-src http://ftp.us.debian.org/debian/ jessie-backports main
Refresh the apt repositories and install the backport
video drivers:
apt update
apt install -t jessie-backports xserver-xorg-video-intel
and optionally:
apt install -t jessie-backports libegl1-mesa libgl1-mesa-dri
These video driver upgrades will allow you to successfully
invoke Crouton, but will NOT provide the desired
additional functionality of swapping back (using Ctrl-Alt-Shift-BackwardArrow)
to ChromeOS. Sadly, as of this writing, we need to
wait for further improvements on using Crouton with the
Intel Broadwell 3205U-based Chromebooks.
LINUX MINT DEBIAN
EDITION ON ACER C740 CHROMEBOOK VIA DUAL-BOOT INSTALL
This model lacks legacy SeaBIOS
functionality, which means that USB alternative OS booting
cannot be used. The solution is to install
replacement firmware for this task:
or
Fortunately, the C740 is only lacking the 'RW_LEGACY
Payload' portion of coreboot, so it is very safe to
upgrade this portion of the firmware without risk of
'bricking' the C740. After entering the superuser
shell (i.e. Ctrl-Alt-t and typing 'shell'),
use either script to update the firmware:
John Lewis script method:
cd
rm -f flash_chromebook_rom.sh
curl -k -L -O https://johnlewis.ie/flash_chromebook_rom.sh
sudo -E bash flash_chromebook_rom.sh
or
Matt DeVillier script method:
cd
rm -f firmware-util.sh
curl -L -O
http://mrchromebox.tech/firmware-util.sh
sudo bash firmware-util.sh
Answer the prompts and the firmware is
upgraded. On the next reboot, Ctrl-L
(for legacy USB booting) is then available in
addition to Ctrl-D (for Developer Mode
ChromeOS booting).
NOTE: The
Matt DeVillier script also includes an option to
remove the developer mode warning screen that is
displayed during bootup -- with a simple
white-text-on-black-screen informatory message.
This option may require the 'write protect screw' to
be temporarily removed.
Unfortunately, after installing Linux Mint Debian
Edition (specifically 'lmde-2-201503' with kernel
version '3.16.0-4') to a portable USB device, and
booting with an Acer C740 with legacy boot enabled, you
will neither have any wireless capabilities, or Cinnamon
desktop (!!!). I got around both obstacles by
temporarily booting the installation on my Acer C720,
and making all necessary changes there first (without
wireless capabilities, it is impossible to install the
required fixes unless you first use an older/working
machine, or copy the required packages manually to the
C740 while it is in this state):
- Newer kernel required: Install the
newest Debian Jessie back-port kernel ('4.5.0-0.bpo.1-amd6' as
of this writing).
If you haven't done so already (for other
non-critical packages as mentioned above), add the
following entries to '/etc/apt/sources.list.d/jessie-backport.list':
deb http://ftp.us.debian.org/debian/ jessie-backports main
deb-src http://ftp.us.debian.org/debian/ jessie-backports main
Refresh the apt repositories and install the backport
video/mesa drivers:
apt update
apt install -t jessie-backports linux-image-amd64
NOTE: Another 'extreme' option is to get the latest mainline kernel from here:
http://kernel.ubuntu.com/~kernel-ppa/mainline/
Specially, you can find the latest non-RC kernel directory in this listing (as of this writing, it was v4.15/). Inside, you would download and then 'dpkg -i' the following pieces:
linux-headers-4.xx.x-xxxxxx_4.xx.x-xxxxxx.yyyymmddhhmm_all.deb
linux-headers-4.xx.x-xxxxxx-generic_4.xx.x-xxxxxx.yyyymmddhhmm_amd64.deb
linux-image-4.xx.x-xxxxxx-generic_4.xx.x-xxxxxx.yyyymmddhhmm_amd64.deb
e.g.
sudo dpkg -i linux-headers-4.15.0-041500_4.15.0-041500.201802011154_all.deb
sudo dpkg -i linux-headers-4.15.0-041500-generic_4.15.0-041500.201802011154_amd64.deb
sudo dpkg -i linux-image-4.15.0-041500-generic_4.15.0-041500.201802011154_amd64.deb
- Newer video drivers required:
Install the newest backport Intel video
packages ('2:2.99.917-2~bpo8+1'
& '11.1.3-1~bpo8+1'
as of this writing):
apt install -t jessie-backports
xserver-xorg-video-intel
and optionally:
apt install -t jessie-backports libegl1-mesa libgl1-mesa-dri
- Newer WiFi drivers required: Install the latest unstable
wifi drivers ('20160110-1'
as of this writing).
First create an unstable repository entry in '/etc/apt/sources.list.d/unstable.list'
and put the following entry into it:
deb
http://ftp.debian.org/debian unstable main
contrib non-free
Then run the following:
apt update
apt install -t unstable firmware-iwlwifi
It would be best to remove (or comment out) this
unstable repository after this is done!
- Adjust the touchpad configuration so that better
functionality (including 'tap-to-click') works by
creating a new file (using sudo) in '/etc/X11/xorg.conf.d/60-touchpad-cmt-auron_paine.conf':
# Configure touchpads to use Chromium Multitouch (cmt) X input driver
Section "InputClass"
Identifier "touchpad auron_paine elan"
MatchIsTouchpad "on"
MatchDevicePath "/dev/input/event*"
MatchProduct "Elan"
Option "Integrated Touchpad" "1"
Option "TapButton1" "1"
Option "TapButton2" "3"
Option "TapButton3" "2"
Option "VertTwoFingerScroll" "on"
Option "HorizTwoFingerScroll" "on"
EndSection
- Adjust the grub boot settings so that the boot menu
is fully visible by un-commenting the following lines
in '/etc/default/grub':
GRUB_TERMINAL=console
GRUB_GFXMODE=640x480
Then put these grub changes into effect by running:
sudo update-grub
You will need to reboot to make all these changes
effective. Other changes mentioned above for the
C720 are also optionally suggested. What you should
end up with is a working Linux Mint LMDE bootable device
that works just as well as on the older Acer C720
Chromebook.
Miscellaneous note: You will NOT be able to use
the 'fstrim' command for
the benefit of LMDE installed on an external USB device
(presumably because the usb-storage kernel module does not
pass the ATA trim command through the USB bridge and
controller to the device).
|
ACER R11
CHROMEBOOK: EXTRA NOTESLINUX MINT DEBIAN
EDITION ON ACER R11 CHROMEBOOK VIA DUAL-BOOT INSTALLExtra steps required for full functionality of the Acer R11 Chromebook are similar to that of the Acer C740 Chromebook, and so the advise is to follow those instructions above.
What was found, however, is that the latest Debian 'backport' kernels were not new enough (at the time) to support the touchscreen, so a much newer kernel was required. As mentioned above, the source for those newer kernel options is here:
http://kernel.ubuntu.com/~kernel-ppa/mainline/
Specially, you can find the latest non-RC kernel directory in this listing (as of this writing, it was v4.15/). Inside, you would download and then 'dpkg -i' the following pieces:
linux-headers-4.xx.x-xxxxxx_4.xx.x-xxxxxx.yyyymmddhhmm_all.deb
linux-headers-4.xx.x-xxxxxx-generic_4.xx.x-xxxxxx.yyyymmddhhmm_amd64.deb
linux-image-4.xx.x-xxxxxx-generic_4.xx.x-xxxxxx.yyyymmddhhmm_amd64.deb
e.g.
sudo dpkg -i linux-headers-4.15.0-041500_4.15.0-041500.201802011154_all.deb
sudo dpkg -i linux-headers-4.15.0-041500-generic_4.15.0-041500.201802011154_amd64.deb
sudo dpkg -i linux-image-4.15.0-041500-generic_4.15.0-041500.201802011154_amd64.deb
As well, since it is possible to flip the display panel of the R11 into a 'tablet' mode, there are benefits to being able to rotate both the screen and touch panel at will. A great script to do this is located here:
https://gist.github.com/mildmojo/48e9025070a2ba40795c In order to use this Cinnamon's keyboard shortcuts, a variation of that script is as follows (for placement into '/usr/local/bin/rotate.sh'):
#!/bin/bash
#
# rotate_desktop.sh
# https://gist.github.com/mildmojo/48e9025070a2ba40795c
#
# (modified into 'rotate.sh' by Darren Enns 2018/03/19)
#
# Rotates modern Linux desktop screen and input devices to match. Handy for
# convertible notebooks. Call this script from panel launchers, keyboard
# shortcuts, or touch gesture bindings (xSwipe, touchegg, etc.).
#
# Using transformation matrix bits taken from:
#   https://wiki.ubuntu.com/X/InputCoordinateTransformation
#
# Configure these to match your hardware (names taken from `xinput` output).

TOUCHPAD='Elan Touchpad'
TOUCHSCREEN='Elan Touchscreen'

function do_rotate
{
  TRANSFORM='Coordinate Transformation Matrix'

  if [ ! -z "$2" ]; then
    orient=$2
  else
    orient=$(xrandr -q --verbose | grep 'connected primary' | awk '{print $6}')

    case "$orient" in
      right)
        orient="normal"
        ;;
      normal)
        orient="left"
        ;;
      left)
        orient="inverted"
        ;;
      inverted)
        orient="right"
        ;;
    esac
  fi

  case "$orient" in
    normal)
      xrandr --output $1 --rotate "normal"
      [ ! -z "$TOUCHPAD" ]    && xinput set-prop "$TOUCHPAD"    "$TRANSFORM" 1 0 0 0 1 0 0 0 1
      [ ! -z "$TOUCHSCREEN" ] && xinput set-prop "$TOUCHSCREEN" "$TRANSFORM" 1 0 0 0 1 0 0 0 1
      ;;
    inverted)
      xrandr --output $1 --rotate "inverted"
      [ ! -z "$TOUCHPAD" ]    && xinput set-prop "$TOUCHPAD"    "$TRANSFORM" -1 0 1 0 -1 1 0 0 1
      [ ! -z "$TOUCHSCREEN" ] && xinput set-prop "$TOUCHSCREEN" "$TRANSFORM" -1 0 1 0 -1 1 0 0 1
      ;;
    left)
      xrandr --output $1 --rotate "left"
      [ ! -z "$TOUCHPAD" ]    && xinput set-prop "$TOUCHPAD"    "$TRANSFORM" 0 -1 1 1 0 0 0 0 1
      [ ! -z "$TOUCHSCREEN" ] && xinput set-prop "$TOUCHSCREEN" "$TRANSFORM" 0 -1 1 1 0 0 0 0 1
      ;;
    right)
      xrandr --output $1 --rotate "right"
      [ ! -z "$TOUCHPAD" ]    && xinput set-prop "$TOUCHPAD"    "$TRANSFORM" 0 1 0 -1 0 1 0 0 1
      [ ! -z "$TOUCHSCREEN" ] && xinput set-prop "$TOUCHSCREEN" "$TRANSFORM" 0 1 0 -1 0 1 0 0 1
      ;;
  esac
}

XDISPLAY=`xrandr --current | grep primary | sed -e 's/ .*//g'`
XROT=`xrandr --current --verbose | grep primary | egrep -o ' (normal|left|inverted|right) '`

do_rotate $XDISPLAY $1
For the actual Cinnamon keyboard shortcut, if you decide to use it: Do this by navigating to the Cinnamon
'Preferences/Keyboard/Keyboard shortcuts' menu
and assigning 'Custom Shortcuts' via the following
keyboard bindings:
Shift+Ctrl+F3= command "/usr/local/bin/rotate.sh" This shortcut matches the same key sequence as ChromeOS uses for the 'rotate screen' function.
NEW 2018/03/29: Success with getting speaker sound to work under Linux LMDE!
This topic is not yet 100% completed, but it was sufficient to get
basic sound working. Be careful! Apparently it is possible to burn out
the speakers if mistreated at high volume levels.
Not easy or intuitive, but mostly working by doing the following: - Install a new kernel (see above -- in my case 4.15 worked, and not sure what lower version would also work)
- Download the missing (!?) firmware drivers for Intel Sound 'firmware-intel-sound' from an appropriate location -- I got it from here, and installed it this way (for some reason, this DEB package was not available using normal 'apt install' commands):
sudo dpkg -i firmware-intel-sound_20161130-3~bpo8+1_all.deb
- Create a new directory (as root) named '/usr/share/alsa/ucm/chtmax98090/' and populate it with two files:
/usr/share/alsa/ucm/chtmax98090/chtmax98090.conf:
Comment "Cyan internal card"

SectionUseCase."HiFi" {
    File "HiFi.conf"
    Comment "Default"
}
/usr/share/alsa/ucm/chtmax98090/HiFi.conf:
SectionVerb {
    Value {
        OutputDspName "speaker_eq"
    }

    EnableSequence [
        cdev "hw:chtmax98090"

        cset "name='codec_out0 mix 0 pcm0_in Switch' on"
        cset "name='media0_out mix 0 media1_in Switch' on"
        cset "name='media1_in Gain 0 Ramp Delay' 50"
        cset "name='media1_in Gain 0 Switch' on"
        cset "name='media1_in Gain 0 Volume' 80% 80%"
        cset "name='pcm0_in Gain 0 Ramp Delay' 50"
        cset "name='pcm0_in Gain 0 Switch' on"
        cset "name='pcm0_in Gain 0 Volume' 80% 80%"
        cset "name='codec_out0 Gain 0 Ramp Delay' 50"
        cset "name='codec_out0 Gain 0 Switch' on"
        cset "name='codec_out0 Gain 0 Volume' 80% 80%"
        cset "name='pcm1_out mix 0 media_loop2_in Switch' 1"
        cset "name='media_loop2_out mix 0 codec_in0 Switch' 1"
        cset "name='codec_in0 Gain 0 Ramp Delay' 50"
        cset "name='codec_in0 Gain 0 Switch' on"
        cset "name='codec_in0 Gain 0 Volume' 80% 80%"
        cset "name='media_loop2_out Gain 0 Ramp Delay' 50"
        cset "name='media_loop2_out Gain 0 Switch' off"
        cset "name='media_loop2_out Gain 0 Volume' 80% 80%"
        cset "name='pcm1_out Gain 0 Ramp Delay' 50"
        cset "name='pcm1_out Gain 0 Switch' on"
        cset "name='pcm1_out Gain 0 Volume' 80% 80%"
        cset "name='Digital EQ 3 Band Switch' off"
        cset "name='Digital EQ 5 Band Switch' off"
        cset "name='Digital EQ 7 Band Switch' off"
        cset "name='Biquad Switch' off"
        cset "name='Filter Mode' Music"
        cset "name='ADC Oversampling Rate' 0"

        cset "name='DMIC Mux' DMIC"
        cset "name='MIC2 Mux' IN34"
        cset "name='Right ADC Mixer MIC2 Switch' on"
        cset "name='Left ADC Mixer MIC2 Switch' on"
        cset "name='MIC2 Volume' 20"
        cset "name='Int Mic Switch' on"

        cset "name='ADCR Boost Volume' 4"
        cset "name='ADCL Boost Volume' 4"
        cset "name='ADCR Volume' 11"
        cset "name='ADCL Volume' 11"

        cset "name='Left Speaker Mixer Left DAC Switch' on"
        cset "name='Right Speaker Mixer Right DAC Switch' on"
        cset "name='Speaker Left Mixer Volume' 2"
        cset "name='Speaker Right Mixer Volume' 2"
        cset "name='Record Path DC Blocking' on"
        cset "name='Playback Path DC Blocking' on"

        cset "name='Headphone Left Switch' on"
        cset "name='Headphone Right Switch' on"
        cset "name='Ext HP Switch' off"

        cset "name='Speaker Left Switch' on"
        cset "name='Speaker Right Switch' on"
        cset "name='Ext Spk Switch' on"

    ]

    DisableSequence [
    ]
}

SectionDevice."Headphone".0 {
    Value {
        JackName "chtmax98090 Headset Jack"
        OutputDspName ""
    }

    EnableSequence [
        cdev "hw:chtmax98090"
        cset "name='Ext Spk Switch' off"
        cset "name='Speaker Left Switch' off"
        cset "name='Speaker Right Switch' off"
        cset "name='Ext HP Switch' on"
    ]
    DisableSequence [
        cdev "hw:chtmax98090"
        cset "name='Ext HP Switch' off"
        cset "name='Ext Spk Switch' on"
        cset "name='Speaker Left Switch' on"
        cset "name='Speaker Right Switch' on"
    ]
}

SectionDevice."Mic".0 {
    Value {
        JackName "chtmax98090 Headset Jack"
    }

    EnableSequence [
        cdev "hw:chtmax98090"
        cset "name='Int Mic Switch' off"
        cset "name='Headset Mic Switch' on"
        cset "name='DMIC Mux' ADC"
        cset "name='Record Path DC Blocking' on"
    ]

    DisableSequence [
        cdev "hw:chtmax98090"
        cset "name='Headset Mic Switch' off"
        cset "name='Int Mic Switch' on"
        cset "name='DMIC Mux' DMIC"
        cset "name='Record Path DC Blocking' off"
    ]
}

SectionModifier."Speaker Swap Mode".0 {
    Comment "Swap the left and right channels of speaker."

    EnableSequence [
        cdev "hw:chtmax98090"

        cset "name='Left Speaker Mixer Left DAC Switch' off"
        cset "name='Right Speaker Mixer Right DAC Switch' off"
        cset "name='Left Speaker Mixer Right DAC Switch' on"
        cset "name='Right Speaker Mixer Left DAC Switch' on"
    ]

    DisableSequence [
        cdev "hw:chtmax98090"

        cset "name='Left Speaker Mixer Right DAC Switch' off"
        cset "name='Right Speaker Mixer Left DAC Switch' off"
        cset "name='Left Speaker Mixer Left DAC Switch' on"
        cset "name='Right Speaker Mixer Right DAC Switch' on"
    ]
}
The instructions to do this came from this bugzilla kernel thread. I wasn't able to 'patch' the 2nd file, so I simply made the simple editing changes manually.
After making these upgrades/installs/changes, I was able to get the familiar 'welcome' chime when starting the Cinnamon desktop in LMDE, but the 'xbindkeys' that I had programmed to change the sound volume levels did not work. I am still not sure why they do not, but I have supplemented them by some others that do in the '$HOME/.xbindkeysrc' file:
"xbacklight -dec 10"
   m:0x0 + c:72
   F6
"xbacklight -inc 10"
   m:0x0 + c:73
   F7
"pactl set-sink-mute 1 toggle; amixer set Master toggle"
   m:0x0 + c:74
   F8
"pactl -- set-sink-volume 1 -10%; amixer sset Master 10%- unmute"
   m:0x0 + c:75
   F9
"pactl set-sink-volume 1 +10%; amixer sset Master 10%+ unmute"
   m:0x0 + c:76
   F10

"xvkbd -xsendevent -text '\[Delete]'"
Alt + BackSpace

"xvkbd -xsendevent -text '\[End]'"
Alt + Right

"xvkbd -xsendevent -text '\[Home]'"
Alt + Left

"xvkbd -xsendevent -text '\[Page_Down]'"
Alt + Down

"xvkbd -xsendevent -text '\[Page_Up]'"
Alt + Up

"xvkbd -xsendevent -text "\A\[Left]""
m:0x0 + c:67
F1

#Forward
"xvkbd -xsendevent -text "\A\[Right]""
m:0x0 + c:68
F2

#Refresh
"xvkbd -xsendevent -text "\Cr""
m:0x0 + c:69
F3
The changes from my other '.xbindkeysrc' files on this page are the addition of 'pactl' commands to modify the sound volume levels.
|